Hibachi Steak & Shrimp with Fried Rice and Yum Yum Sauce
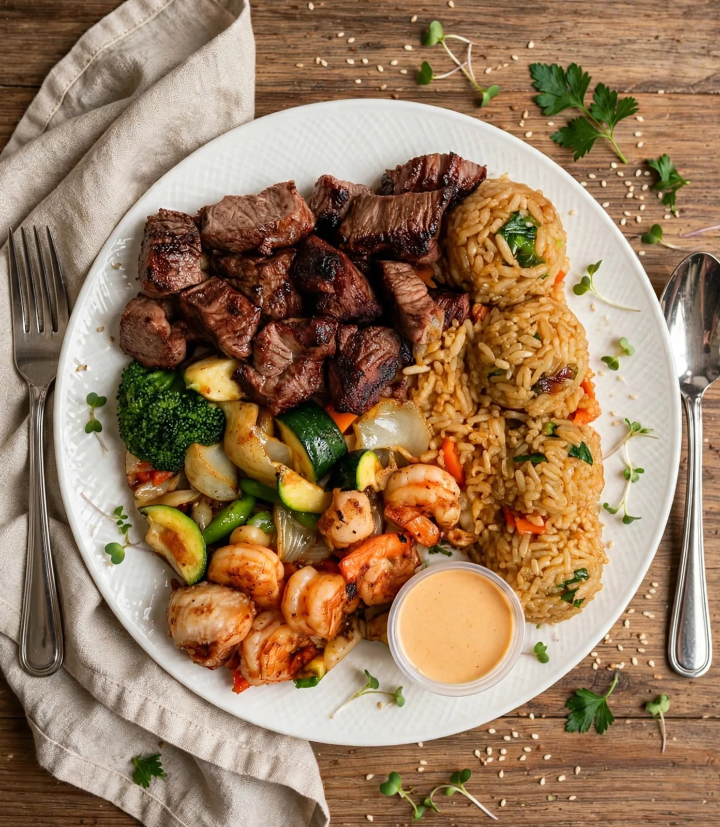
Skip the reservation and the surprise onion volcano this hibachi steak and shrimp recipe brings the hibachi grill experience straight to your kitchen. Think seared, buttery sirloin cubes with a deep caramelized crust, plump garlic-butter shrimp, savory vegetable fried rice studded with scallions, and crisp-tender sautéed zucchini, broccoli, and onions. Drizzle it all with rich, creamy yum yum sauce and you’ve got a takeout-quality dinner that’s honestly better than what you’d get at most hibachi restaurants for a fraction of the price.
This recipe walks through every component of the classic hibachi combo plate: the steak, the shrimp, the fried rice, the vegetables, and that iconic pink-orange yum yum sauce everyone fights over. It’s a full restaurant-style meal made entirely on your stovetop or flat-top griddle.
Why You’ll Love This Recipe
Restaurant flavor at home that signature hibachi sear and buttery, garlicky finish.
One-skillet efficient cook everything in stages using the same pan for max flavor.
Customizable protein swap steak for chicken, or make it shrimp-only or steak-only.
Meal-prep friendly portions beautifully into lunch containers for the week.
That sauce. Homemade yum yum sauce is shockingly easy and tastes better than bottled.
Ingredients
For the Hibachi Steak
- 1.5 lbs sirloin steak, cut into 1-inch cubes
- 2 tablespoons soy sauce
- 1 tablespoon sesame oil
- 2 tablespoons unsalted butter
- 2 cloves garlic, minced
- Salt and black pepper, to taste
For the Hibachi Shrimp
- 1 lb large shrimp, peeled and deveined (tails on or off)
- 1 tablespoon soy sauce
- 1 tablespoon unsalted butter
- 1 clove garlic, minced
- 1/2 teaspoon smoked paprika
- Salt and black pepper, to taste
For the Hibachi Fried Rice
- 3 cups cooked and chilled white rice (day-old is best)
- 2 tablespoons butter
- 1/2 small onion, finely diced
- 1 carrot, finely diced
- 2 green onions, sliced (plus more for garnish)
- 2 large eggs, lightly beaten
- 3 tablespoons soy sauce
- 1 teaspoon sesame oil
- 1 cup baby spinach or shredded cabbage (optional, for color and greens)
For the Sautéed Hibachi Vegetables
- 1 cup broccoli florets
- 1 zucchini, sliced into half-moons
- 1 yellow squash, sliced (optional)
- 1 small yellow onion, sliced into wedges
- 2 tablespoons butter
- 1 tablespoon soy sauce
- Salt and pepper, to taste
For the Yum Yum Sauce
- 1 cup mayonnaise
- 2 tablespoons ketchup
- 1 tablespoon melted butter
- 1 teaspoon garlic powder
- 1 teaspoon paprika
- 1 tablespoon sugar
- 1–2 tablespoons water (to thin, as needed)
- A few dashes of rice vinegar or lemon juice, to taste
Equipment Needed
- Large flat-top griddle, wok, or two large skillets
- Sharp knife and cutting board
- Mixing bowls
- Spatula or tongs
Step-by-Step Instructions
Step 1: Make the Yum Yum Sauce First
Whisk together the mayonnaise, ketchup, melted butter, garlic powder, paprika, and sugar in a bowl until smooth. Thin with a tablespoon or two of water until it reaches a pourable, drizzle-able consistency. Add a small splash of rice vinegar for brightness. Cover and refrigerate the sauce tastes even better after resting for at least 30 minutes.
Step 2: Prep All Your Ingredients
Hibachi cooking moves fast, so have everything cut, measured, and within reach before you turn on the heat: steak cubed, shrimp peeled, vegetables chopped, rice cooked and cooled, eggs beaten.
Step 3: Cook the Steak
Heat a large skillet or griddle over high heat until very hot. Add 1 tablespoon butter, then add the steak cubes in a single layer (work in batches if needed to avoid crowding). Sear for 2–3 minutes per side until deeply browned. In the last minute, add the garlic, remaining butter, soy sauce, sesame oil, salt, and pepper, tossing to coat. Remove from the pan and set aside, tenting with foil.
Step 4: Cook the Shrimp
In the same pan, add a bit more butter and the shrimp in a single layer. Cook for about 1.5–2 minutes per side until pink and opaque. Add garlic, soy sauce, smoked paprika, salt, and pepper in the last 30 seconds. Remove and set aside with the steak.
Step 5: Sauté the Vegetables
Add butter to the same pan and toss in the broccoli, zucchini, squash, and onion. Sauté over medium-high heat for 5–7 minutes, stirring frequently, until crisp-tender and lightly charred at the edges. Season with soy sauce, salt, and pepper. Remove and set aside.
Step 6: Make the Hibachi Fried Rice
In the same pan (or a separate one if you want everything ready at once), melt butter over medium-high heat. Sauté the diced onion and carrot for 2–3 minutes until softened. Push everything to one side, pour the beaten eggs into the empty space, and scramble until just set. Add the cold rice, breaking up any clumps, and toss everything together.
Drizzle with soy sauce and sesame oil, then stir in the green onions and spinach or cabbage if using. Cook for another 3–4 minutes, pressing the rice into the pan occasionally to develop a slightly crispy texture, until everything is well combined and heated through.
Step 7: Plate It Up
Divide the fried rice, steak, shrimp, and sautéed vegetables among plates or a large shared tray, just like the hibachi grill. Garnish with extra sliced green onions and serve with a generous side of yum yum sauce for drizzling or dipping.
Recipe Tips for the Best Hibachi at Home
Use day-old rice. Freshly cooked rice is too moist and will turn mushy in the pan. Cold, day-old rice fries up perfectly crisp.
Don’t overcrowd the pan. Searing steak and shrimp in batches over high heat gives that signature hibachi char instead of steaming the meat.
Butter is the secret weapon. Real hibachi cooks use a generous amount of butter for flavor don’t skimp.
High heat, quick cooking. Hibachi is all about fast, hot cooking, so have every ingredient prepped before you start.
Let the yum yum sauce rest. The flavor deepens significantly after 30 minutes to an hour in the fridge.
Recipe Variations
Chicken hibachi: Swap the steak for cubed chicken thighs or breast.
Scallop hibachi: Add or swap in seared scallops for an upscale twist.
Spicy yum yum sauce: Stir in a teaspoon of sriracha or chili garlic sauce.
Low-carb version: Use cauliflower rice instead of white rice for the fried rice base.
Vegetarian hibachi: Skip the steak and shrimp, and add extra mushrooms, tofu, and vegetables.
What to Serve With Hibachi Steak and Shrimp
Miso soup or a simple ginger salad to start
Steamed edamame
Extra sautéed mushrooms
Iced green tea or a light Japanese lager
Storage and Reheating
Store leftovers in separate airtight containers in the refrigerator for up to 3–4 days. Reheat the rice, steak, and vegetables in a hot skillet with a touch of butter or oil to revive the texture (microwaving works too, but the skillet keeps things crisp). The yum yum sauce keeps well refrigerated for up to a week.
Frequently Asked Questions
What cut of steak is best for hibachi?
Sirloin is the classic choice for great flavor and tenderness at a reasonable price, but ribeye or New York strip also work beautifully if you want something richer.
Can I make yum yum sauce without butter?
Yes, you can omit the butter for a slightly lighter sauce, though the melted butter is part of what gives authentic yum yum sauce its signature richness.
Why is my hibachi rice mushy instead of crispy?
This almost always comes down to using freshly cooked, warm rice instead of cold, day-old rice. The extra moisture in fresh rice steams instead of frying.
Can I cook this on a flat-top griddle instead of a skillet?
Absolutely a large flat-top griddle (like a Blackstone) is actually ideal and gets you closer to the authentic hibachi restaurant experience, since you can cook multiple components at once with more surface area.
If you try this hibachi steak and shrimp recipe at home, snap a photo and tag us and don’t forget to save this one for your next takeout craving!